
Post Refresh steps -Oracle ERP Cloud
- Satya
- Jul 25, 2020
- 3 min read

In this Post i will outline the mandatory and optional steps to perform after the P2T or T2T. Perform the following steps prior to releasing to the end users.
At a high level below are the steps one need to perform after the instance refresh.
1) Setup Override email address at BPM Level
2) Setup Override email address for suppliers
3) Stop Remittance advice's going out to Suppliers
4) Disable Check Printer
5) Upload Void Check templates
6)Watermark Logo and background changes
7) Important ESS Jobs to run
8)Add a Global Banner Message
9)Clear BI Cache
10) Alter Customer profile classes
Step1 : Setup Override email address at BPM Level
Login to the application > On the home page > Top Right > Click on notification bell icon > More details > A pop up page gets populated As shown below

POP up Page > Click on Administration

Go to Test Notification email address and enter a value as shown below.

Perform Save . this will ensure to redirect any notification originated from BPM process in the entire application to the test email address
2) Setup Override email address for suppliers
Navigate to setup and maintenance > Manage Purchasing Profile options
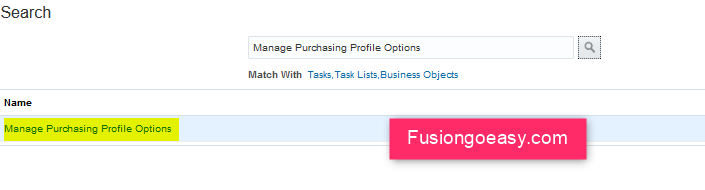
Click on PO_CONTROL_SUPPLIER_COMMUNICATION

Select the profile value as shown below and perform save.

Click on PO_NOTIFICATION_OVERRIDE_EMAIL

Add the profile value as shown below.

This will ensure emails related to PO output for communications got to the override email address instead of supplier.
3) Stop Remittance advice's going out to Suppliers
Navigate to Manage Disbursement System options

Remove the value from Separate remittance advice from email

Failure to complete the above will result in test email being sent to the actual supplier recipients.
4) Disable Check Printer
Navigate to BI > Administration >

Click on Manage BI Publisher
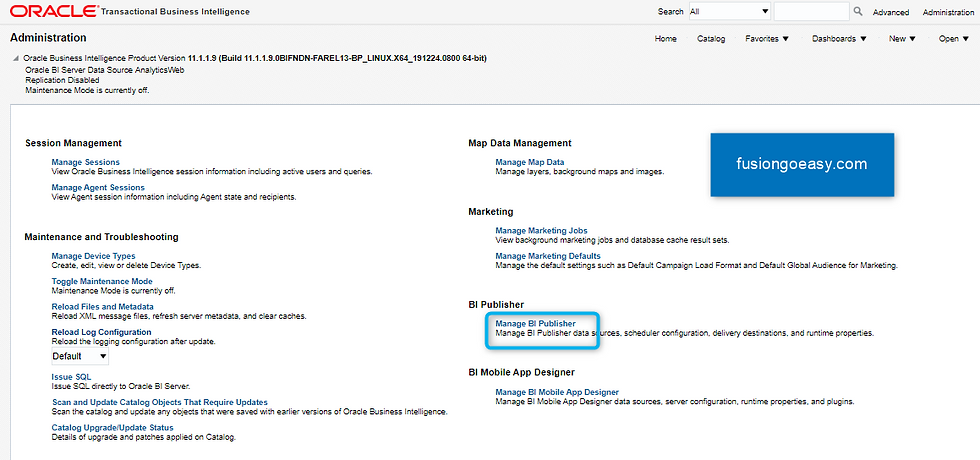
Under Delivery > click on printer

Select the printer and delete.


5) Upload Void Check templates
This step is optional , if you delete the check printer configuration then there is no need to perform the same otherwise , one have to download all custom check templates and upload the same with VOID watermark. This will ensure that in case of check print's from non prod instances , the check prints with VOID mark which makes it invalid.
6)Watermark Logo and background changes
This step is crucial as through this , one can add a custom look and feel to differentiate from prod instance.
Navigate to Configuration> Sandbox >

Click on Create Sandbox

Give the Sandbox name and Select Appearance from All tools and Create and enter

you see some thing like this on top of the Application.

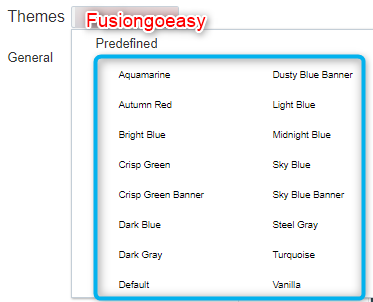
Click on Appearance which will give you the ability to select a theme and modify the background

Available out of box themes
once can add the client specific branding image as show below .
There are also other properties available to alter as per client preferences

Page and button level properties

Once Done once can get the below options to save or delete . Click on Apply

Click on Publish sandbox to make the changes visible to all other users on the instance.

7)Few Important ESS Jobs to run
There are few ESS jobs one need to run after every refresh .
ESS Job name :Create General ledger Balance Cubes
This job will create or rebuild balance cubes.
ESS Job Name : Create Budgetary Control Balance Cubes
This job will creates or rebuilds budgetary control balances cube
based on the combination of budget chart of account and budget calendar
8) Add a Global Banner to show a custom message
We can add a global message which can be viewed from any page by any user. This will be helpful to communicate a common message like an announcement or just an information about the instance.
Navigate to > setup and maintenance > Search for the below

Enter Profile option code =’ FND_BANNER_MESSAGE’ and hit search.

Click on Save and close. The message will display as shown below.

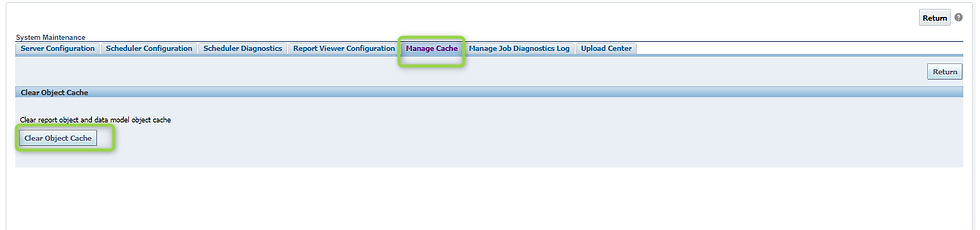
9)Clear BI Cache
The server cache stores report definitions, report data, and report output documents. If you need to manually purge this cache for example, after patching use the Manage Cache page.


10) Alter Customer profile classes .
This is important step to perform when you have multiple customer profile classes
Altering these profiles will stop the Customer statements and dunning letters going to the actual customers.
Navigate to Setup and Maintenance > Search Task > Manage Receivables Customer Profile Classes.

Remove the send statement flag and preferred contact method

Hope this post helps .


Comments